Back-to-Back Testing
Modern software development is all about quick delivery. Most development teams follow agile methodology and continuous delivery to cater to their customers’ changing needs. Although these continuous updates are great for keeping the product competitive, they also come with the risk of introducing bugs or breaking existing functionalities.
Hence, you need a method to ensure that a new release doesn’t necessarily break your system and still generates the same outputs as your previous release. However, you must ensure this process is simple and efficient while meeting the above requirements. This is where back-to-back testing comes into the picture.
What Is Back-to-Back Testing?
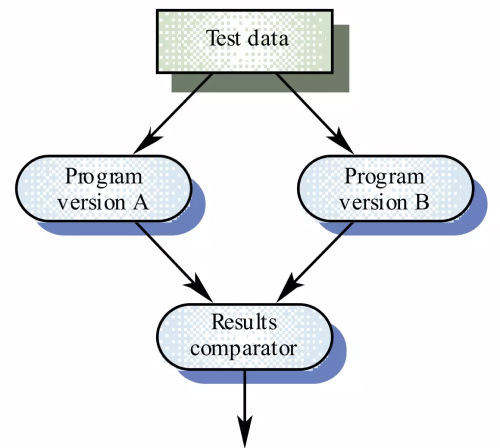
Back-to-back testing is a software testing technique where two or more versions of a system are tested simultaneously by feeding them the same input. Then, the outputs are compared to ensure that a new version of your software produces the same results as the old version.
By doing so, teams can identify any unusual behaviors and address them on a proactive basis. It also helps teams ensure that the new software version has no errors.
How Does Back-to-Back Testing Work?
Back-to-back testing works in a simple approach in which it compares the findings of two systems or components by using the same pre-conditions and the same input data. Here’s a detailed walkthrough:

When we compare two components in back-to-back testing, we are actually measuring the parameter values generated through certain actions on both of them. We need to ensure that every input is exactly the same; otherwise, the input could affect the output.
Here are the steps you need to follow to implement back-to-back testing.
Step 1: Define testing objectives
The first step in back-to-back testing is to define the objectives of the test. This includes identifying the systems or components that will be tested, the specific performance metrics that will be measured, and the conditions under which the tests will be run.
Step 2: Set up test environments
Next, you have to set up the test environments for the systems or components being tested. This includes configuring the test environments with the necessary hardware and software and ensuring the environments are identical for each tested system or component.
Step 3: Run the tests
Once you’ve set up your test environments, you can run the tests. Ensure that the same set of tests is executed on each system or component, using the same inputs and under the same conditions.
Step 4: Collect and analyze the data
Next, analyze the data collected during the test case execution. This includes comparing the output from each system or component to determine if there are any significant differences in performance.
Step 5: Identify and resolve issues
If you identify any issues, bugs, or anything out of the ordinary, document them and convey them to your development team to ensure they are addressed as soon as possible.
Step 6: Documentation
The final step is to document and report the test results to the relevant stakeholders. This includes providing detailed information on the systems or components that were tested, the test conditions, the test results, and any identified issues or defects.
What Are the Benefits of Back-to-Back Testing?
As you can see, back-to-back testing can be extremely beneficial in identifying issues. But there’s more to it than the eye. Here are some key benefits of using back-to-back testing:
- Ensures consistency: It ensures that new software versions produce the same results as old versions, so you know nothing important has changed or broken.
- Detects errors: By comparing outputs, it quickly identifies any errors or unexpected changes that might have been introduced during updates.
- Validates improvements: When you make improvements or add new features, back-to-back testing helps verify that these changes work as intended without affecting other parts of the system.
- Simplifies regression testing: It’s a straightforward way to check that new changes haven’t messed up existing features, making regression testing easier.
- Boosts confidence: Confirming that new and old versions behave the same way gives developers and stakeholders confidence that the software is reliable and stable.
What Are the Drawbacks of Back-to-Back Testing?
But this doesn’t mean that back-to-back testing is always a good approach. It has some drawbacks you should be aware of before considering if it is the right fit for you.
- Limited scope: Back-to-back testing only considers the input data and the output. This means that beyond the response, nothing else can be observed. This makes it hard to understand if there are any architectural impacts. However, this can be indirectly tested by using non-functional testing techniques such as performance testing and comparing the metrics of the two systems.
- Time-consuming: Setting up multiple versions of the system and running all the tests can take a lot of time and effort.
- False positives: Sometimes, small, insignificant differences in outputs can trigger alerts, making you think there’s a problem when there really isn’t.
- Resource-intensive: Running tests on multiple system versions simultaneously requires more computing resources and can be demanding in your testing environment.
- Doesn’t catch all bugs: Back-to-back testing won’t catch the error if the new and old versions produce the same incorrect output. It only checks for consistency, not correctness.
Should You Do Back-to-Back Testing?
The simple answer is – there isn’t one right answer.
It completely depends on your requirements. If your system has frequent releases and you want to verify everything is in order, implementing back-to-back testing can be a good idea.

